The Curriculum Integration Chart
Origins
Early in the evolution of the fabrication of Long-Range Planning Boards— before the Red Cups —as a first step toward, Doreen had teachers complete two-dimensional Curriculum Integration Charts (one for each month of the school semester or year) to display their Design Challenges with related subject matter to develop an integrated curriculum. The Curriculum Integration Chart did not achieve what she intended. Because the Chart had only one color for Guided Lessons, teachers had difficulty imagining how a single Design Challenge leads to the teaching of multiple subjects. Instead, they planned all of their lessons around only one subject per Design Challenge.
This stumbling block was all about color. Doreen changed the Design Challenge triangle on the Chart from blue, a cool color, to a dynamic red and used two different colors to show state required Standards and Guided Lessons. Revising the Curriculum Integration Chart proved that visual perception matters.
With the addition of the three-dimensional Red Cups as the crucial starting point in a Design-Based Learning teacher’s curricular planning, the multicolored Curriculum Integration Charts document the story-driven, multi-subject content that the teacher writes on and in each Red Cup. The process of completing the Red Cups and the Curriculum Integration Charts culminates in the fabrication of Long-Range Planning Boards that reflect each teacher’s unique, semester or yearlong curriculum in a comprehensive, creative, and highly professional display.
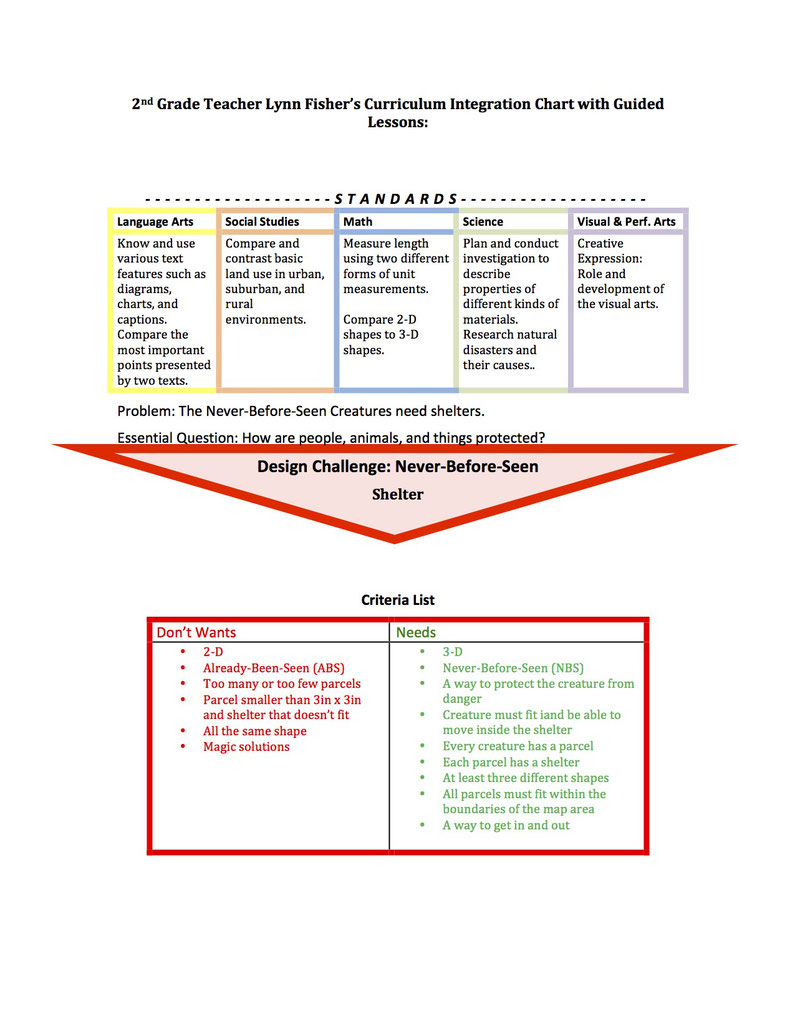
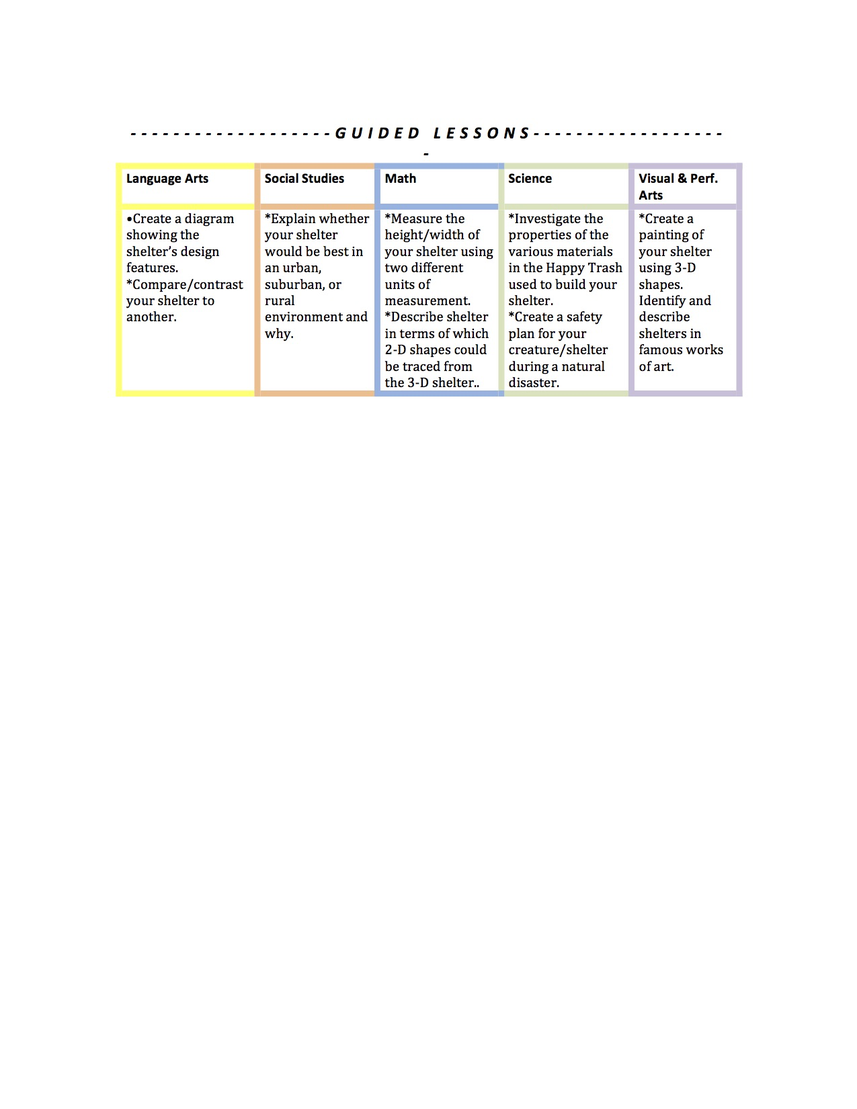
What a Blank Curriculum Integration Chart Looks Like

A Curriculum Integration Chart Example
A Teacher's Point of View
Jen Sobara, a high school math and science teacher and Design-Based Learning trainer who graduated from the Master’s Degree program at Cal Poly in 2008, was part of Doreen Nelson’s group exploring the possibility of teaching teachers about sequence using the Red Cups. Jen took some convincing that the three-dimensional Red Cups experience mattered, feeling that it was too time-consuming.
“We discussed the Red Cups, and honestly I wasn’t buying into them,” Jen said. “There was general consensus in the group that the Red Cups would be awkward to work with and that their purpose was not really clear. Yes, we ask our teachers to have their kids solve problems in 3-D, so it would be hypocritical if we didn't ask our teachers to do the same. Yes, the Red Cups represented the Design Challenges that brought together the Standards and Guided Lessons, but we thought we could do better.
“After playing around with a bunch of different designs for the container, and talking about them with Doreen, I realized that my lack of enthusiasm and subsequent marginal presentation of the Red Cups was because I didn't get it. What Doreen meant, hadn’t sunk in: that the Red Cups were, in fact, a 3-D representation of a 2-D planning chart—and that using them asked novice Design-Based Learning teachers to think in the same way we teach them to get their kids to think. It really came together,” Jen said, “when we started working on revising the Curriculum Integration Chart. It was a revelation to me when Doreen held up a Red Cup, pointed out the way it tapers down, and related it to the upside down triangle on the Curriculum Integration Chart. (Duh.)
“The only major modification we made was to revise the requirements for the Red Cup process. We clearly stated that each Red Cup represented one Design Challenge. Standards and Guided Lessons with colors coded to at least five different subjects had to fill the Red Cups. A series of Red Cups needed to be linked, but the order had to be able to change. And, the links between the Red Cups needed to be adjustable to show the varied amounts of time spent on the Design Challenges, and the lengths of time between them.
“Now in teacher training it is amazing how significant the Red Cups are. The teachers’ solutions are fun, well thought out, creative and unique. What is really fun, was to watch the participants work with the Red Cups and to see what didn’t make sense to me at first, makes perfect sense to them.”
The Red Cups, the Curriculum Integration Charts, and the Long-Range Planning Boards are planning tools for delivering a semester or yearlong curriculum as a progression of Design Challenges from simple to complex. Through this physical planning process, integral to my Design-Based Learning methodology, teachers develop an integrated curriculum, implementing a story that captures the imagination of students as they build three-dimensional artifacts to represent what they are learning. Over the 40-plus years that Doreen Nelson has taught teachers to do this, what has surfaced is that when K-12 students see what’s in store for them over the semester or year, they hurry to learn basic skills and Guided Lessons, eagerly awaiting the next Design Challenge.
* The Doreen Nelson Method of Design-Based Learning (DBL) is protected by copyright and trademark law. Do not publish or make commercial use of any DBL materials without prior written permission. For details, visit csupomona.edu/copyright.html.
The Red Cups Explained
How the Red Cups Came About
The Red Cups are used to Kick-Start the Making and Displaying of an Integrated Curriculum. It took Doreen Gehry Nelson 15 years before she figured out how to streamline having teachers make Long-Range Planning Boards. Working with teacher leaders to prepare for training other teachers in my Design-Based Learning methodology, she remembered how easy it was to use an orange crate as a container for developing a sequential, integrated curriculum during the last course she took at UCLA before achieving her teaching degree and credential. Unofficially called “The Seeds Box,” this course was developed by Corinne Seeds, a John Dewey disciple, for whom the Seeds University Elementary School at UCLA was named, and it was taught by her disciple, Charlotte Crabtree. The requirement for the final exam, based on Dewey’s philosophical pedagogy of learning by doing, was to develop a comprehensive course of study—around such units as Early California, the Pilgrims, the Westward Movement, the United Nations, or Japan. To do this, we prepared a large box (an orange crate) containing a step-by-step, yearlong, cross-curricular teaching sequence. The point was to learn how major concepts in the social sciences were the nucleus for hands-on activities and lessons connected to subject matter and basic skills. Each step in a sequence specified the actual reading, math, science, and language arts lessons that related to a concept and described the physical artifacts that students would build.
Adhering to the details required to make a “Seeds Box” taught Doreen to study state and district requirements and to use the textbooks to amplify subjects within a unit. The end result was a course of study that made sense to her, readied her for teaching, and has served her throughout her teaching career. With the “Seeds Box” in mind, Doreen followed her own methodology and devised an activity using the spatial domain to speed-up the long-range planning process.
Doreen kick-started the process by having teachers use a simple red plastic cup as a three-dimensional container representing a single Design Challenge. They filled the cup with Guided Lessons written on color-coded Post-It-Notes based on required Standards for a variety of subjects. The Red Cups sped up learning for teachers like crazy. Now, in the initial Design-Based Learning training, teachers prepare for their first three months of school by filling three Red Cups with color-coded Guided Lessons related to separate Design Challenges. By the end of the next training, teachers have filled five to 10 Red Cups to display their own plan for each month of an entire semester or school year. The final training, “Making Curriculum Physical,” is now devoted to refining a contextual story, studying the State Standards, and fabricating the portable, multipurpose Long-Range Planning Boards that formalize each teacher’s semester or yearlong curriculum. Experiencing this process expands teachers understanding of how to construct a sequential, integrated curriculum.
Red Cups in Action: Planning to Teach Across the Curriculum
As teachers plan their yearlong sequence, they name Design Challenges on their Red Cups, then write Guided Lessons on Post-It Notes of different colors specifying their grade level curriculum or subject matter focus and put the Post-It Notes in the appropriate Red Cup. They order the Cups into a sequential story with a context (a city, a colony, an island, a civilization, a biological system). They cut or tear off the tops of the Red Cups to show that some Design Challenges require less time. They connect the Cups with different lengths of string to indicate how much time will be spent in total on a Design Challenge and its related Guided Lessons.
The result of the Red Cup experience is a concrete representation of a comprehensive, integrated curriculum. Teachers become expertly familiar with the mandatory State Standards and, as part of their long-range planning process, they identify ways to teach higher-level thinking skills as well as the speaking and writing skills required across subjects and grade levels.
Textbooks tell teachers to present “page 7” and have students answer the questions on “page 8,” but not how to make the information on “page 7” usable and reusable in the long term. The Red Cups, when strung together, make a sequential, long-term story that is presented to students as a simulated experience that is organic and fluid. This enables teachers to easily use textbooks differently. Instead of teaching chapter by chapter, they teach across the curriculum, choosing chapters from multiple textbooks and using other source materials to teach subject matter derived from each Design Challenge. Textbooks and technology become a resource to support students’ creative and critical thinking.
Since 2001, there have been anywhere from 30 to 100 teachers from grades K-12 attending each Design-Based Learning Five-Day Summer Institute for Teachers at ArtCenter College of Design in Pasadena, CA. The photos below show how teachers, during their short time at the Institute, develop a sequence of three Design Challenges by checking the State Standards via computer in order to fill three Red Cups with Guided Lessons that are color-coded to display an integrated curriculum.
* The Doreen Nelson Method of Design-Based Learning (DBL) is protected by copyright and trademark law. Do not publish or make commercial use of any DBL materials without prior written permission. For details, visit csupomona.edu/copyright.html.
Backwards Thinking Explained
What is Backwards Thinking?
K–12 classroom teachers learning the Design-Based Learning methodology find that using Backwards Thinking™ doesn’t require a whole new series of lessons or a new curriculum. All that is needed is to rethink the sequence of lessons to amplify any mandated curriculum and “sneak up” on learning.
To facilitate teachers’ understanding of the Backwards Thinking™ process, Leslie Stoltz, a teacher at Chaparral Middle School in the Walnut Valley Unified School District in Diamond Bar, California, who taught Design Based Learning to hundreds of teachers, worked with Doreen Nelson to develop the 6 ½ steps of Backwards Thinking™ graphic shown below. These 6 ½ steps are not rigid. To achieve the teaching of creative and critical thinking, however, the following three steps are essential: Step 3, “Set Criteria for Assessment,” based on the required curriculum; Step 4, “Give It a Try,” the springboard for Step 5:“Teach Guided Lessons.”
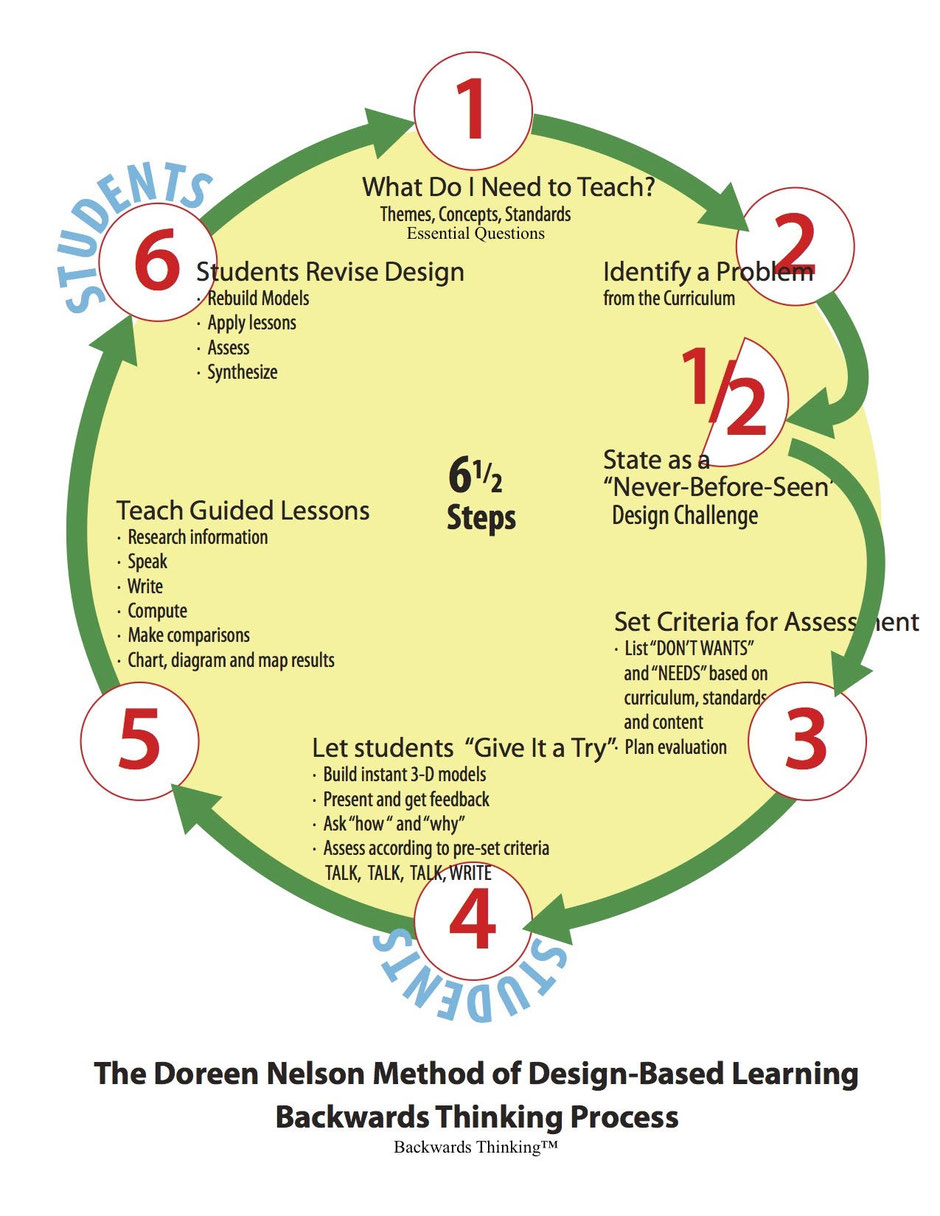
The 6½ Steps of Backwards Thinking
Step 1: What Do I Need to Teach? Themes, Concepts, Standards
Each Design Challenge is derived from an Essential Question organized around a topic or a theme that comes from the required Standards. Example: migration.
Step 2: Identify a “Problem” from the Curriculum
Examples: Why do people migrate? How do natural resources define cultures? Why did cities come into being?
Step 2 ½: State a “Never-Before-Seen” Design Challenge
Step 3: Set Criteria for Assessment
- List “DON’T WANTS” and “NEEDS” based on curriculum, standards, and content.
- Plan evaluation
Step 4: Let students “Give It a Try” (Duration: 45 minutes to 2 hours)
Students:
- Build instant 3-D models
- Present and get feedback
- Learn to ask “how“ and “why”
- Learn to self-assess according to pre-set criteria
- TALK, TALK, TALK, WRITE: Students learn to describe their designs
- through presentation and discussion as preparation for writing.
Step 5: Teach Guided Lessons (Duration: one week to a month)
Teach Guided Lessons in any subject using students’ personal connection to their Never-Before-Seen artifacts as a tool for learning. Examples: the mathematics of the artifact’s size, shape, and volume; its scientific feasibility, the language and art skills of reading, speaking, writing, and drawing.
Students:
- Research information
- Speak
- Write
- Compute
- Make comparisons
- Chart, diagram, and map results
Step 6: Students Revise Design
Students:
- Rebuild Models
- Apply lessons
- Assess
- Synthesize
Here's an example
An Example of the Design-Based Learning 6 ½ Step Process of Backwards Thinking™, Taught as an Integrated Curriculum at the 3rd Grade Level
Students Design Never-Before-Seen Creatures
Duration: One Month
Materials:
- Paper
- Recycled materials
- Criteria List
Step 1: What Do I Need To Teach?
The Essential Question: How do humans protect themselves and their world?
Step 2: Identify The Problem
Students’ Never-Before-Seen Creatures (built in a previous Design Challenge) need a way to protect themselves from the elements and enemies in their city.
Step 2 ½: State the Design Challenge
Build a Never-Before-Seen Shelter. (“Our creatures need to protect themselves. Invent how they will do it in a Never-Before-Seen Shelter that you build.” To promote originality, the teacher emphasizes, “your designs need to be something that you have never seen before.”)
Step 3: Set Criteria For Assessment
Introduce the Criteria List for the Never-Before-Seen Shelter Design Challenge. The words on the List come from the Social Studies and Science curricula that require the teaching of how humans have protected themselves from extremes of nature and other dangers. (This vocabulary prepares students for the Guided Lessons ahead.) The Don’t Wants on the left side are in red, meaning “stop” or “no,” prompting students to air their opinions about what should be avoided and why. The Needs on the right are in green, meaning “yes” or “go,” adhering to curricular requirements. Check for understanding of the words on the Criteria List by having students read the list and ask questions for clarification.
CRITERIA LIST
Don’t Wants Needs
|
Already Seen
|
Never-Before-Seen |
|
Drawings |
Three-dimensional |
|
Ordinary houses with the usual doors and windows |
Ways to get in and out Ways to provide light and air |
|
Temporary solutions |
Forever solutions for protection from the extremes of nature: Rain Floods Wind Hurricanes Extreme heat and cold Earthquakes |
|
Harmful or ugly solutions: guns, bars on the Shelter, or prisons |
Protection from mean people |
Step 4: Let Students Give It A Try
Working alone or in groups, after selecting a variety of materials, students have 20 to 30 minutes to build their solutions, adhering to the Criteria List. If they start building forts or houses, referring them back to the Criteria List stops replication. After building their rough models, students are taught to talk about them in different settings. They learn to give oral presentations explaining their reasoning for their Never-Before-Seen Shelters and to listen to and question their classmates’ presentations. They TALK, TALK, TALK, WRITE. Small groups of students vote on the best design in their group; each group presents a summary of its chosen design to the whole class. Students then draw and write about the details of their Never-Before-Seen Shelters.
Step 5: Teach the Guided Lessons
Students are guided to:
- Collect and compare scientific data to their Never-Before-Seen Shelter solutions for weather events and earthquakes.
- Determine the geometric shapes and volume of their artifacts.
- Diagram their Never-Before-Seen Shelters, labeled with exact measurements.
- Differentiate how humans throughout history have protected themselves.
- Write and edit original compositions using descriptive language to explain what it’s like to live in their Never-Before-Seen Shelters.
Step 6: Have Students Revise Their Designs
Students apply the information learned through Guided Lessons to revise their designs. They propose and discuss the changes they want to make to their Never-Before-Seen Shelters and why. The revision process is based on students’ research and the changes they propose making to their artifacts. Their proposed revisions can be spoken or built. Built is better.
Some Final Thoughts
Through all the years that the Design-Based Learning methodology has evolved, but there has always been one significant constant: when students of any age start their learning process with their own original creations based on required criteria, they become facile at making changes and reusing learned information and they come to experience problem seeking and problem solving as an engaging type of play and want to participate.
During a visit with Jerome Bruner in 2015, he told Doreen Nelson, “I worry that today’s drive toward subject matter accountability is freezing creative thinking.” Doreen’s years of experience have shown her that it is not an either/or, that good test scores and creative thinking are compatible. The data collected consistently show that students in classrooms using the Design-Based Learning methodology excel. The quantitative data show that standardized test scores in Language Arts, Math, Science, and other subjects improve markedly, even for English language learners and those with learning disabilities. The qualitative data collected from students, teachers, administrators, and parents through surveys and anecdotal records describe the positive impact of Design-Based Learning on student engagement and understanding.
* The Doreen Nelson Method of Design-Based Learning (DBL) is protected by copyright and trademark law. Do not publish or make commercial use of any DBL materials without prior written permission. For details, visit csupomona.edu/copyright.html.